- Published on
AWS Springboot Guide
- Authors

- Name
- Don O
- @teopeurt
Introduction
Pre-Prep
When I have my Platform Engineer hat on " I wear many hats - a mad hatter ", the main arsenal in my toolbox is Docker. Here I will be showing you how one can compile a Java based Spring boot app and deploy to AWS platform. I will go through in another post, how one can write testable code using Spring Boot cloud functions and compile down to native so one does not fall foul of the slow run-times on AWS Lambda platforms.
" Insert here some clever quip about Spring and Lambda - there is a joke in there somehow "
Starting with Spring Boot version 3, the possibility of creating native executables with GraalVM is now considerably easier. Before, we had to use the spring-native project that was in an experimental state. GraalVM is a high performance Java distribution that enables compilation to native code using ahead-of-time (AOT) compilation. This means that we will no longer have a JAR as the result of the compilation process, which we later need to pass as a parameter to the Java virtual machine. The resulting file is a native executable instead! This implies a dramatic speed improvement, that is most evident in the time Spring takes to start.
Installing GraalVM
The steps described in this article have been tested on an EC2 virtual machine running the amazon-linux2 operating system…… NO.. Use Docker
Verifying the installation
Now we can see that, by default, we will use GraalVM executing the following command:
..NO use Docker
Additional GraalVM requirements
GraalVM has certain dependencies. First, it installs GCC (Gnu Compiler Collection), which is the C code compiler typical in Linux systems….NO.. Use Docker
Compiling ( in native )
Our project is based in a cloud function created with Spring Boot. The creation of the cloud function can be checked in a previous post.
Next thing we need is to install Maven … No Use Docker
Here is the DockerFile
FROM goodforgod/amazonlinux-graalvm:23.0.0-java17 AS build-aot
RUN /usr/lib/graalvm/bin/gu install native-image
RUN ln -s /usr/lib/graalvm/bin/native-image /usr/bin/native-image
ENV JAVA_HOME /usr/lib/graalvm
COPY ./pom.xml ./pom.xml
COPY src ./src/
COPY ./.mvn ./.mvn/
COPY ./mvnw ./mvnw
ENV MAVEN_OPTS='-Xmx8g'
RUN ./mvnw --no-transfer-progress native:compile -Pnative -Dmaven.test.skip=true -X
FROM public.ecr.aws/lts/ubuntu:22.04
RUN apt-get update -y && apt-get install zip unzip
WORKDIR /
COPY /home/application/target/moss-api /
COPY ./nativeBootstrap bootstrap
#UN #cp nativeBootstrap bootstrap
USER root
RUN chmod 755 bootstrap
RUN zip -r runtime.zip \
bootstrap \
moss-api
Line by Line explanation
Basic pom.xml to get things working - not library versions
<?xml version="1.0" encoding="UTF-8"?>
<project xmlns="http://maven.apache.org/POM/4.0.0" xmlns:xsi="http://www.w3.org/2001/XMLSchema-instance"
         xsi:schemaLocation="http://maven.apache.org/POM/4.0.0 https://maven.apache.org/xsd/maven-4.0.0.xsd">
    <modelVersion>4.0.0</modelVersion>
    <parent>
        <groupId>org.springframework.boot</groupId>
        <artifactId>spring-boot-starter-parent</artifactId>
        <version>3.2.1</version>
        <relativePath/> <!-- lookup parent from repository -->
    </parent>
    <groupId>com.example</groupId>
    <artifactId>spring-cloud-function-aws</artifactId>
    <version>0.0.1-SNAPSHOT</version>
    <name>spring-cloud-function-aws</name>
    <description>spring-cloud-function-aws</description>
    <properties>
        <java.version>17</java.version>
        <spring-cloud.version>2023.0.0</spring-cloud.version>
    </properties>
    <dependencies>
        <dependency>
            <groupId>org.springframework.boot</groupId>
            <artifactId>spring-boot-starter</artifactId>
        </dependency>
        <dependency>
            <groupId>org.springframework.cloud</groupId>
            <artifactId>spring-cloud-function-context</artifactId>
        </dependency>

        <dependency>
            <groupId>org.springframework.boot</groupId>
            <artifactId>spring-boot-starter-test</artifactId>
            <scope>test</scope>
        </dependency>
    </dependencies>
    <dependencyManagement>
        <dependencies>
            <dependency>
                <groupId>org.springframework.cloud</groupId>
                <artifactId>spring-cloud-dependencies</artifactId>
                <version>${spring-cloud.version}</version>
                <type>pom</type>
                <scope>import</scope>
            </dependency>
        </dependencies>
    </dependencyManagement>

    <build>
        <plugins>
            <plugin>
                <groupId>org.graalvm.buildtools</groupId>
                <artifactId>native-maven-plugin</artifactId>
            </plugin>
            <plugin>
                <groupId>org.springframework.boot</groupId>
                <artifactId>spring-boot-maven-plugin</artifactId>
            </plugin>
        </plugins>
    </build>

</project>
Preparing the project to be executed in AWS Lambda
We were missing the serialization hints, which are a bit changed from the experimental version. Serialization hints are needed because GraalVM does not go along well with everything that has a dynamic behaviour, so we must explicit what classes we need to serialise. In particular, the event is received in serialised form by Lambda, and it needs to be converted to a Java object. For this, we have to create a class to register the hints in the following way:
public class MyRuntimeHints implements RuntimeHintsRegistrar {

    @Override
    public void registerHints(RuntimeHints hints, ClassLoader classLoader) {
        // Register serialization
        hints.serialization().registerType(AppSyncEvent.class);
        hints.serialization().registerType(AppSyncEvent.Arguments.class);
    }

}
And in the main class we say that we need to use these hints:
@SpringBootApplication
@ImportRuntimeHints(MyRuntimeHints.class)
public class LambdaApplication {

 public static void main(String[] args) {
  SpringApplication.run(LambdaApplication.class, args);
 }
}
Preparing the native executable to be executed in AWS Lambda
In order to upload the executable to AWS Lambda we need to pack it with together with a bootstrap file, which indicates to Lambda how to execute our code. The boostrap file looks like this:
#!/bin/sh
cd ${LAMBDA_TASK_ROOT:-.}
./lambda-executable
We must take into account that the bootstrap file has to be runnable.
And now we just have to compress in the same zip file the runnable file and the bootstrap.
Actual Build (with Docker)
Do a docker build
docker build -t awssample:latest .
Extract the runtime zip
docker run --rm --entrypoint cat awssample:latest runtime.zip > runtime.zip
The beauty of this is that this is platform agnostic and can quickly be integrated into a CICD build.. So lets do that
Uploading the file to AWS and testing (Using CDK)
Now we just have to upload the zip to AWS Lambda, selecting as runtime environment: custom runtime on Amazon Linux 2.
CDK Sample File in Typescript - the most relevant part
new Function(this, functionId, {

            functionName: "functionName",
            runtime: Runtime.PROVIDED_AL2,
            code: Code.fromAsset('./lambda/runtime.zip'),
            handler: "handlerPath",
            memorySize: 512,
            environment: {
                spring_cloud_function_definition: "springFunctionName",
                MAIN_CLASS: "com.example.SpringApplication",
            },
            logRetention: RetentionDays.ONE_WEEK,
            timeout: timeOut,

        });
Manual Testing
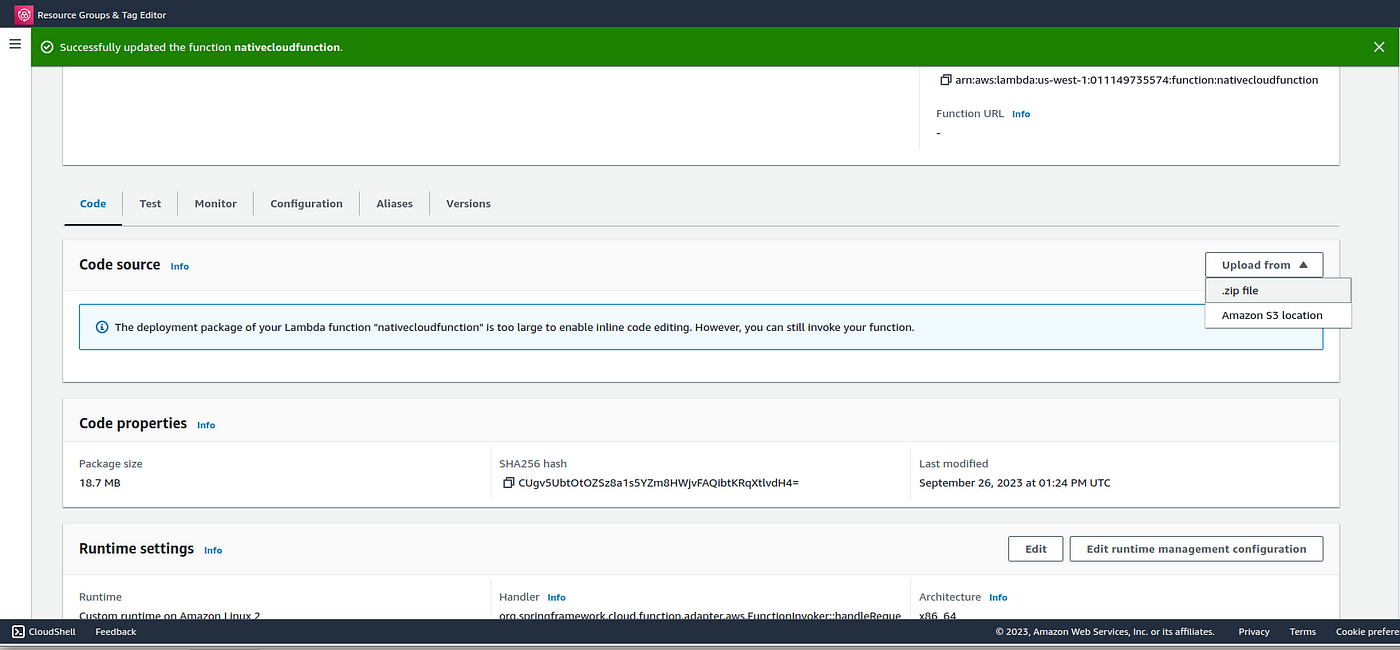
Uploading the zip file with the native cloud function
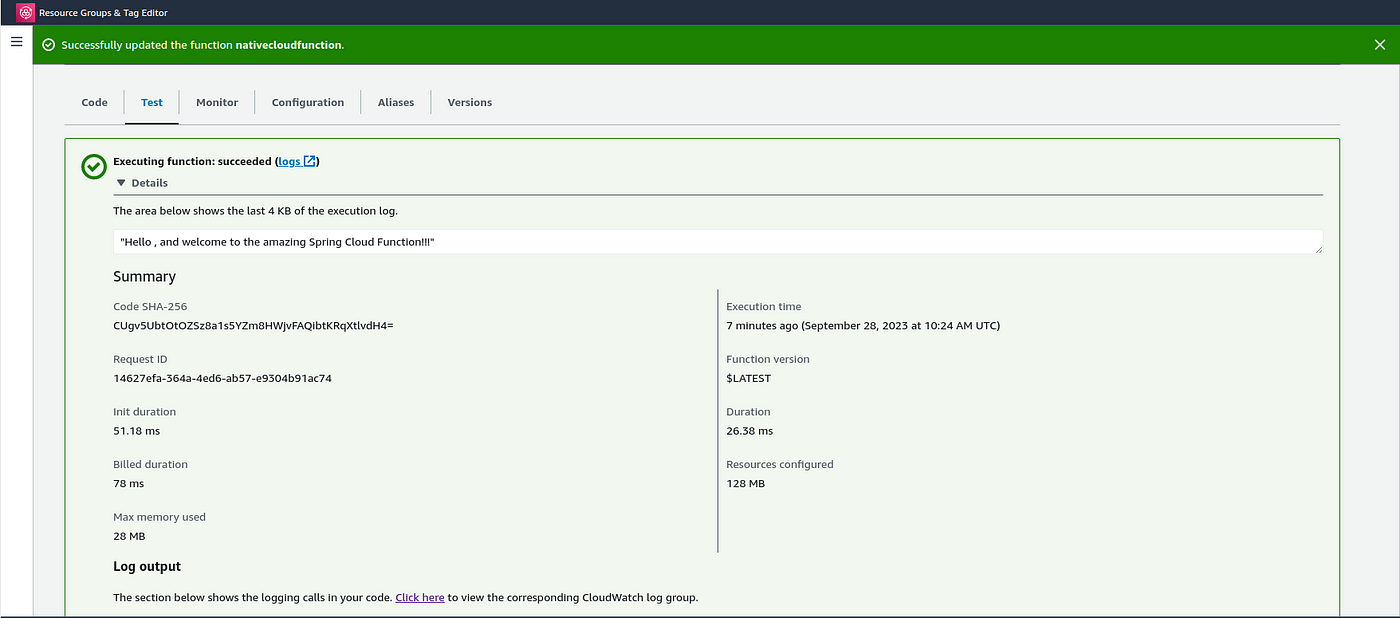
After that, we can create a simple test event, send it, and our lambda will respond!
Test Automation
- Artillery
- X-Ray